Introduction
Python Django is full stack framework that allows you to build any sort of website you wish to build. Many Python Web Developers around the globe using Django to build comprehensive websites and web systems. The very popular social network like YouTube, Instagram also trusting the Python Django for their development. Whether you want to build next billion-dollar social network or helpful SaaS Django is for you.
Project Creation
First, we must create a Python virtual environment. Execute the below command to create a python virtual environment.
python -m venv virt
This will create the “virt” folder for our python virtual environment and you could name whatever you like but I like to name it as “virt”.
Next, we must activate our virtual environment like below.
source virt/Scripts/activate
(If you on windows and you using git bash terminal.)
source virt/bin/activate
(If you on linux or mac)
.\virt\Scripts\activate
(If you on windows powershell)
If you successfully activate your virtual environment, you will see something like (virt) will appear on your terminal you use. If you see this congratulations! You activated your Python virtual environment, and you all set to install Django in your virtual environment.
Now I’m assuming you activated your virtual environment please check (virt) appear on your terminal or not.
Let’s install Django via pip package manager.
pip install django
After you executed this command, you could execute the bellow command to see what you installed with the pip install command.
pip freeze
You can view the installed python packages after the execution of above command. Now you all set to create you first Python Django Project.
django-admin startproject myproject
Use the above command to create you first Python Django project called myproject if you like you could name your project whatever you like.
Now you can change the direction into you project by using the bellow command in your terminal.
cd myproject
Now you in your project folder. Now you could run your development server by using the bellow command. Before running your development server, you should make sure you are in the correct directory to execute these commands. You could use bellow command to verify you are in the correct directory.
ls
After you execute the above command if you saw a file called “manage.py” you are in the right place.
Now you could execute the command to run your development server.
python manage.py runserver
Open your favourite browser and go to the 127.0.0.1:8000 and you will see a default landing page of Python Django. Congratulations! If you make it this far.
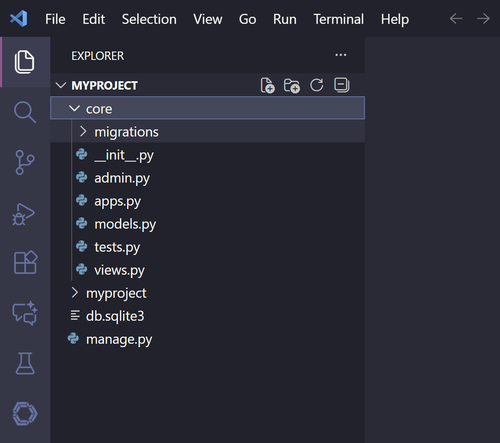
Now let’s create some custom views so you could create your custom web pages, and you can view them instead of the Django’s default landing page. Open your project “myproject” in your favourite Code Editor in my case I’m using VS Code but feel free to use a code editor like Sublime Text Editor like software.
Now you could see the Python Django folder structure in the left-hand side pane. We will use Django best practices to create our views. Therefore, we must create our very first Django app inside our project to do that open your terminal and make sure your python virtual environment is turned on.
python manage.py startapp core
Now go to you text editor and you should see there’s a new folder called core. This is the Django app we just created.
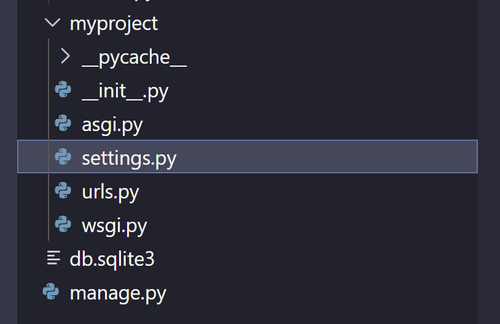
Now open your settings.py file it’s inside of the myproject folder.

And in settings.py file find the INSTALLED_APPS and add your ‘core’ app there. Because we must register our newly created app into our project.
Now we can create URL routes for our newly create core app. Open your myprojects/urls.py file. This is commonly called project level urls.py file by Python Django developers.
And in there please add the below code.
from django.urls import path
from .import views

urlpatterns = [
    path('', views.home, name='home'),
    path('about/', views.about, name='about'),
]
Now root URL is now configured to the core app. Now let’s create our templates and view functions.
First, we must create the html pages like base.html, index.html in core app templates folder. Don’t worry we still not create the templates folder. We will create those next.
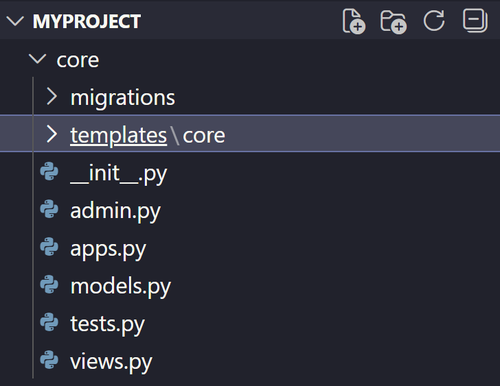
Right click on your core app folder you could find it in your left-hand pane and create a new folder called “templates”. Again, right click on the templates folder and create a folder called “core”. Remember “core” is the app that we created if you use any other name, please add your app name to name your folder. This is the standard way of creating html pages in a Python Django project.
Your directories should look like below.
Now right click on core folder and create a file called “base.html”. Place standard html code here in vs code you could type “!” mark and press enter this will create a basic html code structure.

You could add your CSS links, metadata and other links here. Then update this code as bellow.
{% load static %}
<!DOCTYPE html>
<html lang="en">
<head>
    <meta charset="UTF-8">
    <meta name="viewport" content="width=device-width, initial-scale=1.0">
    <title>Document</title>
</head>
<body>
    {% block content %}
    {% endblock %}
</body>
</html>
Please add the updated code lines to the base.html. You can see we added code inside of curly braces. This is the language, or this is the scripting style we use to code our Django templates. This language or scripting style is unique to the Python Django. This is very powerful technology you could add logics to your template right away by using this method.
Now let’s create our index.html file this is our home page template. Add the index.html file in your templates/core folder. Then update the code shown as bellow.
{% extends 'core/base.html' %}

{% block content %}
<section>
    <div>
        <p>Tech Vista Idea</p>
    </div>
</section>
{% endblock %}
Upper code you can see in the first line we extend our base.html file so we don’t need to create the basic html structure for the home page. Because we already have it because we extend the base.html file code to this index.html file. Then you can see the line three and line nine we created the block and inside it we included the code for the home page. This is the approach you should follow when you create pages in Python Django.
Now we created our home page let’s create the view function for the home page. In your core app there’s a file called views.py please open this file and type the below code for the home view function.
from django.shortcuts import render

# Create your views here.
def home(request):
    return render(request, 'core/index.html', {})
Above you can see our home view function, in python Django we should pass request always when we create a view function. Then we are return render the actual web page. Curly braces are used to define the context dictionary. If you have any variables to pass into the web page you could define it here and then in the template, you could use this variable and its associated value. In our home view function, we didn’t pass anything to the home.html we just want to render the home.html when the user is going to our website.
Now we have our template which is html page in Django we call this as template, and we also have the view function which is called view in Django. Only thing we left to do is create the URL for the home page.
Let's do that, please create a new urls.py file inside your app folder and add the below code to the file.
from django.urls import path
from .import views

urlpatterns = [
    path('', views.home, name='home'),
]
You can see we are importing the path from Django URLs. In second line we are importing the views so we could define the home view function in this urls.py file. Next, we define the URL patterns. In the fourth line we created the path for the home page, inside of quotation mark I include nothing which means this home page can view by going to the root URL. Next, we defined the view function which is home view function. Finally, we gave a name to our URL, so we could reference the URL in any page of the website whenever we want to define the home URL.
Now you all set please go to this URL http://127.0.0.1:8000/ You can see your webpage now appearing in the root URL. Congratulations! Now you know how to create web pages and view them by using your browser.
For further understanding about URL configurations in Python Django let’s create another page called about.
Now you know where to create your web pages please create your “about.html” web page in templates/core directory and added the below code.
{% extends 'core/base.html' %}

{% block content %}
<section>
    <div>
        <p>About Page.</p>
    </div>
</section>
{% endblock %}
Now let’s create our view for this page in core/views.py file. Added the below code in core/views.py file.
def about(request):
    return render(request, 'core/about.html', {})
Now let’s create our URL route for this view after this we can render our about page in the browser.
from django.urls import path
from .import views

urlpatterns = [
    path('', views.home, name='home'),
    path('about/', views.about, name='about'),
]
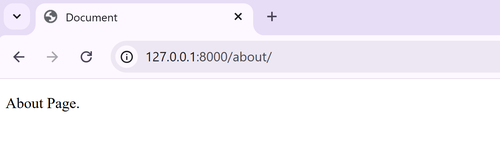
Now this about page will appear in the URL http://127.0.0.1:8000/about/.
Now you know how to configure different pages with different URL routes in Python Django. So that’s the end of this blog article. In next blog articles we will learn how to style our web page by using TailwindCSS. Stay with us to learn How to set up TailwindCSS to your Python Django Projects. Thank you! For reading our article. Feel free to add a comment below if you do it, we really appreciate it. Feel free to add comments about what you want to learn next about Python Django. We will read each comment. Again, Thank you! Very much and take care.